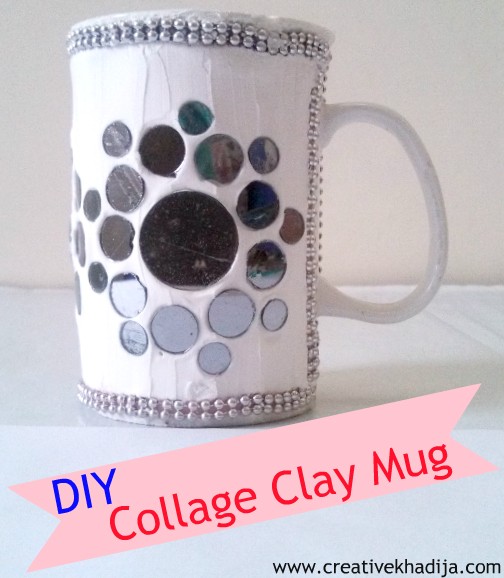
Collage Clay
Mug Decorated with Mirrors and Collage Clay-Tutorial
Are you an angry dishwasher? Or do you have toddlers & kids at home? You might think what irrelevant questions I am asking here but basically these two are the BIG reasons behind broken-chipped crockery in your kitchen! haha. Seriously! Well, I am blessed with two little nieces who are used to play with crockery whenever they found it in their reach. They are growing fast MashaAllah :) So now kitchen crockery is sometimes in danger!
My little niece shot another coffee mug but that was chipped only. You know what I did? I simply grab the chipped mug when her Mom was going to throw it in the trash basket, I decorated it with Mod Podge Collage Clay & some mirrors which usually used for embroidery & decorative purpose. And then I have returned the mug to her. Now she is happily having this mug as her make up brushes holder :)
Would you like to see how I have decorated this chipped mug? Have a look here!
Mug Decorated with Mirrors and Collage Clay-Tutorial
Mug Decorated with Mirrors and Collage Clay-Tutorial
Isn’t it a good idea to reuse & recycle chipped crockery? I really found it interesting. It’s so easy yet fun!
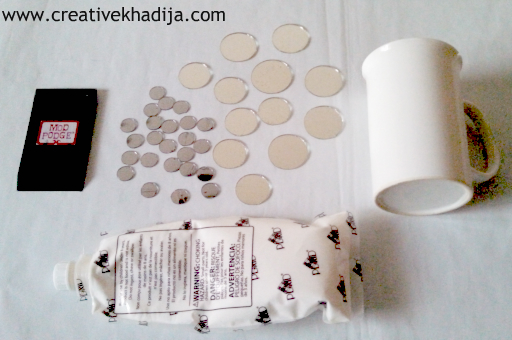
You will only need a few craft supplies for this decorated mug container. See below;
Supplies you will need :
Mod Podge Collage Clay
Decorative Embroidery round Mirrors 3 different sizes.
Beads lace.
Spatula for applying .
And definitely a mug or container.
Mug Decorated with Mirrors and Collage Clay-Tutorial
As it was a plain cream white mug, So this white collage clay is a perfect match. I have pink collage clay too. I forgot to put the beads lace here in the image above. It was a faux silver beads lace.
Mug Decorated with Mirrors and Collage Clay-Tutorial
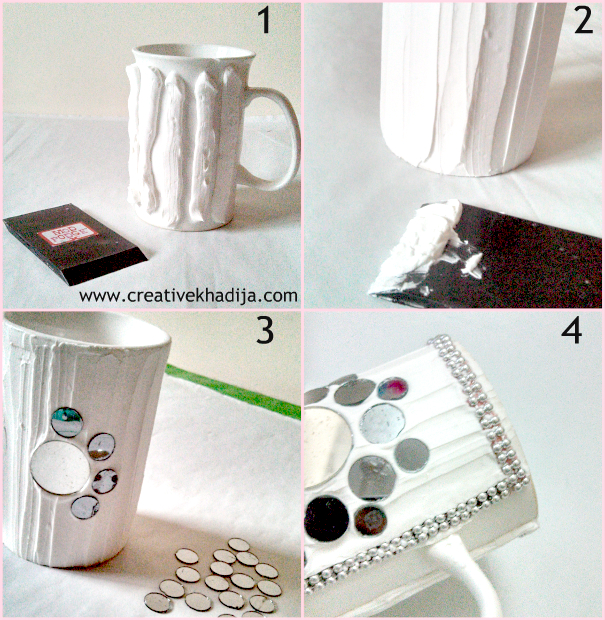
1- First I apply the collage clay on the mug directly from the bag, There are 3 different nozzles shapes but as I were going to try this plain, So I used it without nozzle. (On the other hand it’s not much fun cleaning the nozzles after crafting, hehe)
2- Then spread it on the mug smoothly with rubber spatula.
3- Start fixing mirrors on the mug before it gets dry.
4- Fix the beads lace at sides, I tried to hide the chipped spot of the mug & yeah, its no more visible now!
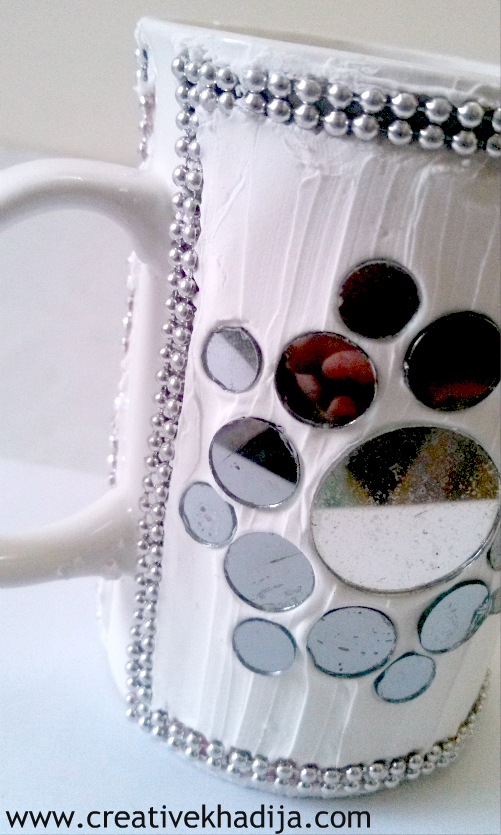
Mug with Collage Clay-Tutorial
Let it dry overnight. Or at least for 10 hours, & it is done! While capturing this click, I found trouble as the mirrors were reflecting with a cracked glimpse of me in these.. Hahaha! Anyways.. Don’t stalk & have a look at the mug! It’s ready now :)
Now you can put your make up brushes inside, or markers, paint brushes, pencils etc. You can also fill this kinda decorated mug with candies & chocolates for gifting your friends. Isn’t it a good idea?
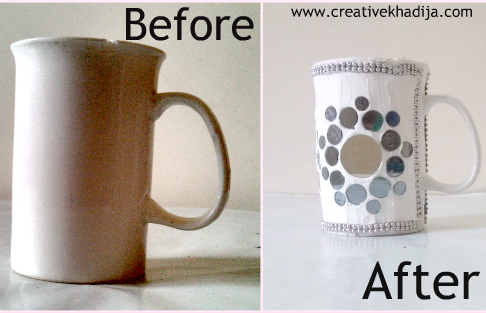
Mug Decorated with Collage Clay-Tutorial
Before & after version..
Here did you notice any blunder?Actually collage clay is not perfectly pasted, It’s a bit thick at the middle of the mug, that’s why the mug shape is a bit different. So if you are going to make this, be sure to keep this in your mind otherwise a disturbed shape might ruin your project look.
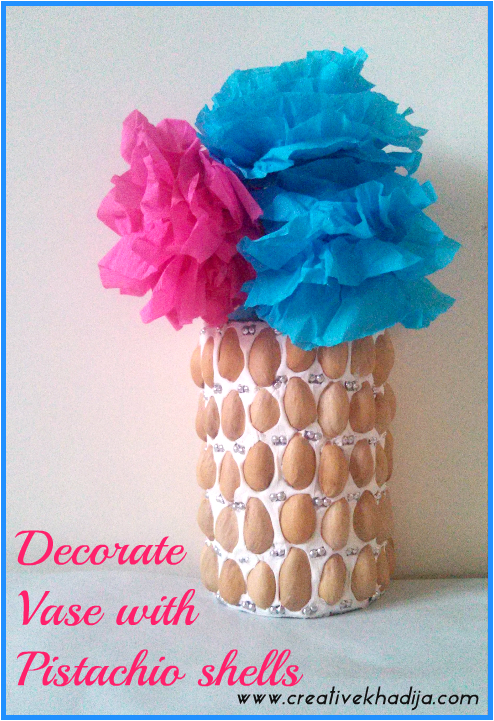
Do you remember a few months back I made a flower vase with collage clay & pistachios? Tutorial Here
I enjoyed crafting with collage clay! So many possibilities & so many ideas. I am having another collage clay craft project images in my camera, Will upload on the blog later. I hope you will like that one too :)
You can enjoy my other projects with Collage Clay HERE
I wrote my previous article after a few hours of earthquake. Indeed it was terrible experience. I started getting emails & messages at my social media from online & blogger friends from all over the world, So I thought to update my blog & tell others about safety of me & my family. Alhamdulillah everything is normal now. Death toll increased around 350 & much destruction specially in one province of Pakistan. They truly need prayers as weather is getting cold & effected areas are in more trouble because of snow falling & landsliding. Keep those helpless people in your prayers!
I am really blessed to be a blogger! For me.. Blogging is not just a hobby & leisure thing, I learned a lot via blogging, I have amazing friends from all over the world now. I was surprised to see my email inbox at the next day of earthquake, There were many emails in different languages, I never knew I have readers in these countries from where I were getting wishful messages. They were asking about Me & my family/relatives if anyone is in Earthquake effected areas of Pakistan!
Thank you so much for your prayers & well wishes. You sweet ladies are simply amazing. Keep reading my blog. So nice of you all readers/bloggers/followers & specially silent admirers! May God Almighty bless you all :)
Thank you!
Khadija


27 Comments